.svg)

As water restrictions and droughts are set to become more common in the future, we need to start changing the way we garden if we want to see our precious plants survive and thrive.
Of course, the easiest solution is to set up your own water supply, be it via a rainwater tank linked to your gutters or reusing your grey water. Unfortunately, however, a rainwater tank does not mean much if there isn’t any rain, a very real problem many of us faced the last couple of months.
So, what can we do if we only have a limited amount of (grey) water but would still like an inviting, green, flowering garden? Here are a few (Swellendam) tried and tested tips and tricks I’d like to share with you.
Plant Indigenous: The most obvious solution is to plant indigenous trees, shrubs, and bulbs. These plants are adapted to our climate and have a much higher tolerance range than Northern Hemisphere species. Think Agapanthus, Gazania, Vygies, Sour Fig, Plectranthus, Plumbago, Num Num, Spekboom, Aloes, Proteas, Succulents, Starry wild jasmine, Strelitzia, Clivia, Wild Olive, Tree Fuchsia, Pom Pom Tree, Coral Tree.
A wonderful book to consult if you want to explore indigenous gardening is: South African Indigenous Garden Plants, the gardener’s guide by Pooley, Nichols and Hankey.
Mulching: No matter what you plant, everything needs water at some point (non-indigenous needing more than indigenous). To trap as much water/ moisture as possible, mulching is key. Mulching is when you spread a layer of organic material (e.g., wood chips, straw, bark, rooibos, stone fruit pips) over the soil. Not only does this conserve the moisture, but it keeps the plant roots cool, suppresses weed growth, and improves the soil health as it breaks down.
Ground covers: Mulching works wonders on its own, but mulching and planting a ground cover together works even better! We’ve done this around our citrus and fruit trees using Sour fig (Carpobrotus edulis), and Baby sunrose (Mesembryanthemum cordifolium).
A bonus is that numerous pollinators LOVE these flowers (see photo).
Direct watering: Let's face it, watering with a hosepipe is very convenient, but it is also very wasteful, as you water everything around the plant you are aiming to water. Direct watering, either with a watering jug or by using a drip-irrigation system, allows each plant to be watered purposefully. During our very dire days in December, I started watering my plants with grey water using what I like to call the sponge method. You soak the sponge and then slowly squeeze it out over the plant, making sure that all the water gets absorbed before squeezing more. I used a car sponge, which fills a half 1l yogurt tub when squeezed out, and did this for each plant (yes, it is very labour-intensive) every 5 days. My cosmos, zinnia, and sunflowers are still standing, so I guess it works well.
Mound planting: If you are thinking of planting any trees in the near future and have hard clay soil or soil filled with building rubble (thinking of the people at Die Boord who got gifted trees at the end of last year), then I’d strongly suggest you plant it in a raised mound rather than just digging a hole.
Mound planting, as the name implies, is when you plant the trees/ shrubs on raised mounds of soil. Doing this allows the roots to develop above the existing compacted soil and promotes drainage and aeration. When we planted our fruit and nut tree orchard, we were working with incredibly hard clay filled with old building rubble. So we decided to do mound building, but to ‘level up’ a notch.
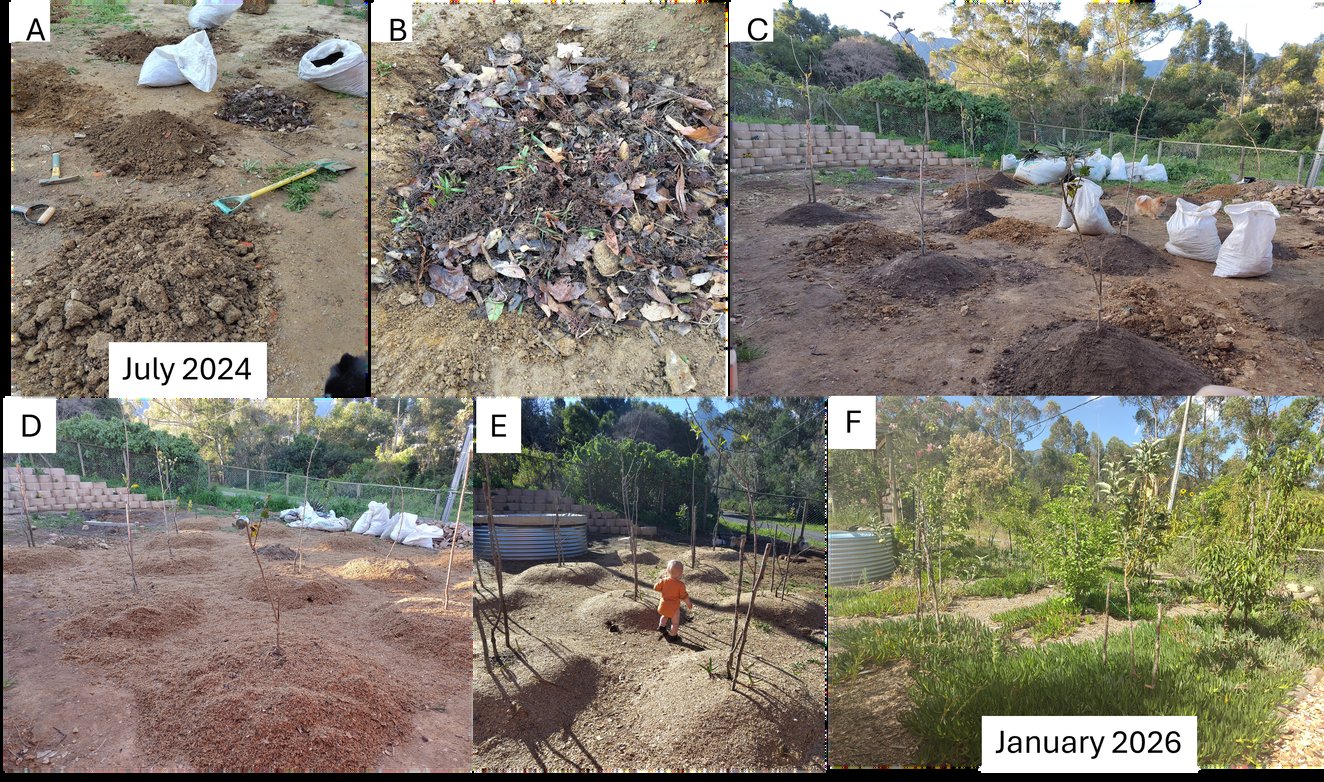
Firstly, we loosened the soil (photo A) by digging holes approximately 1mx1m, 60cm deep. We then filled these holes with organic material (mostly leaves- photo B).
Then, we used a mixture of the clay we took out of the hole, potting soil, and building sand to build the mound on top of the organic material (photo C).
The trees were planted in this mound (also photo C), before covering everything with a thick layer of woodchips (bought from the sawmill – photo D) and planting sour fig cuttings around the trees (photo F). I
t’s been 1.5 years since planting, and our trees are flourishing despite the limited water they receive (photo G).
Article and photos by Genevieve Diedericks (SBC Vice Chairperson)
Hero photo: Crassula ovata — S.G.S (CC0), via Wikimedia Commons.